
What are Users?
Users are individuals who access and work within Manor. User accounts control who can log in, what they can see and do, and how their work is tracked. Proper user management ensures security, accountability, and appropriate access for everyone in your organization.
Why User Management Matters
Managing users effectively helps you:
- Control access - Ensure only authorized people can access the system
- Track work - Associate time entries, tasks, and activities with specific people
- Assign permissions - Give users appropriate access based on their roles
- Manage schedules - Track flextime, time off, and work schedules
- Integrate services - Connect users to external services like email and calendar
- Invoice correctly - Give each user's billable time the right product number for your accounting software
Creating a New User
To create a new user:
-
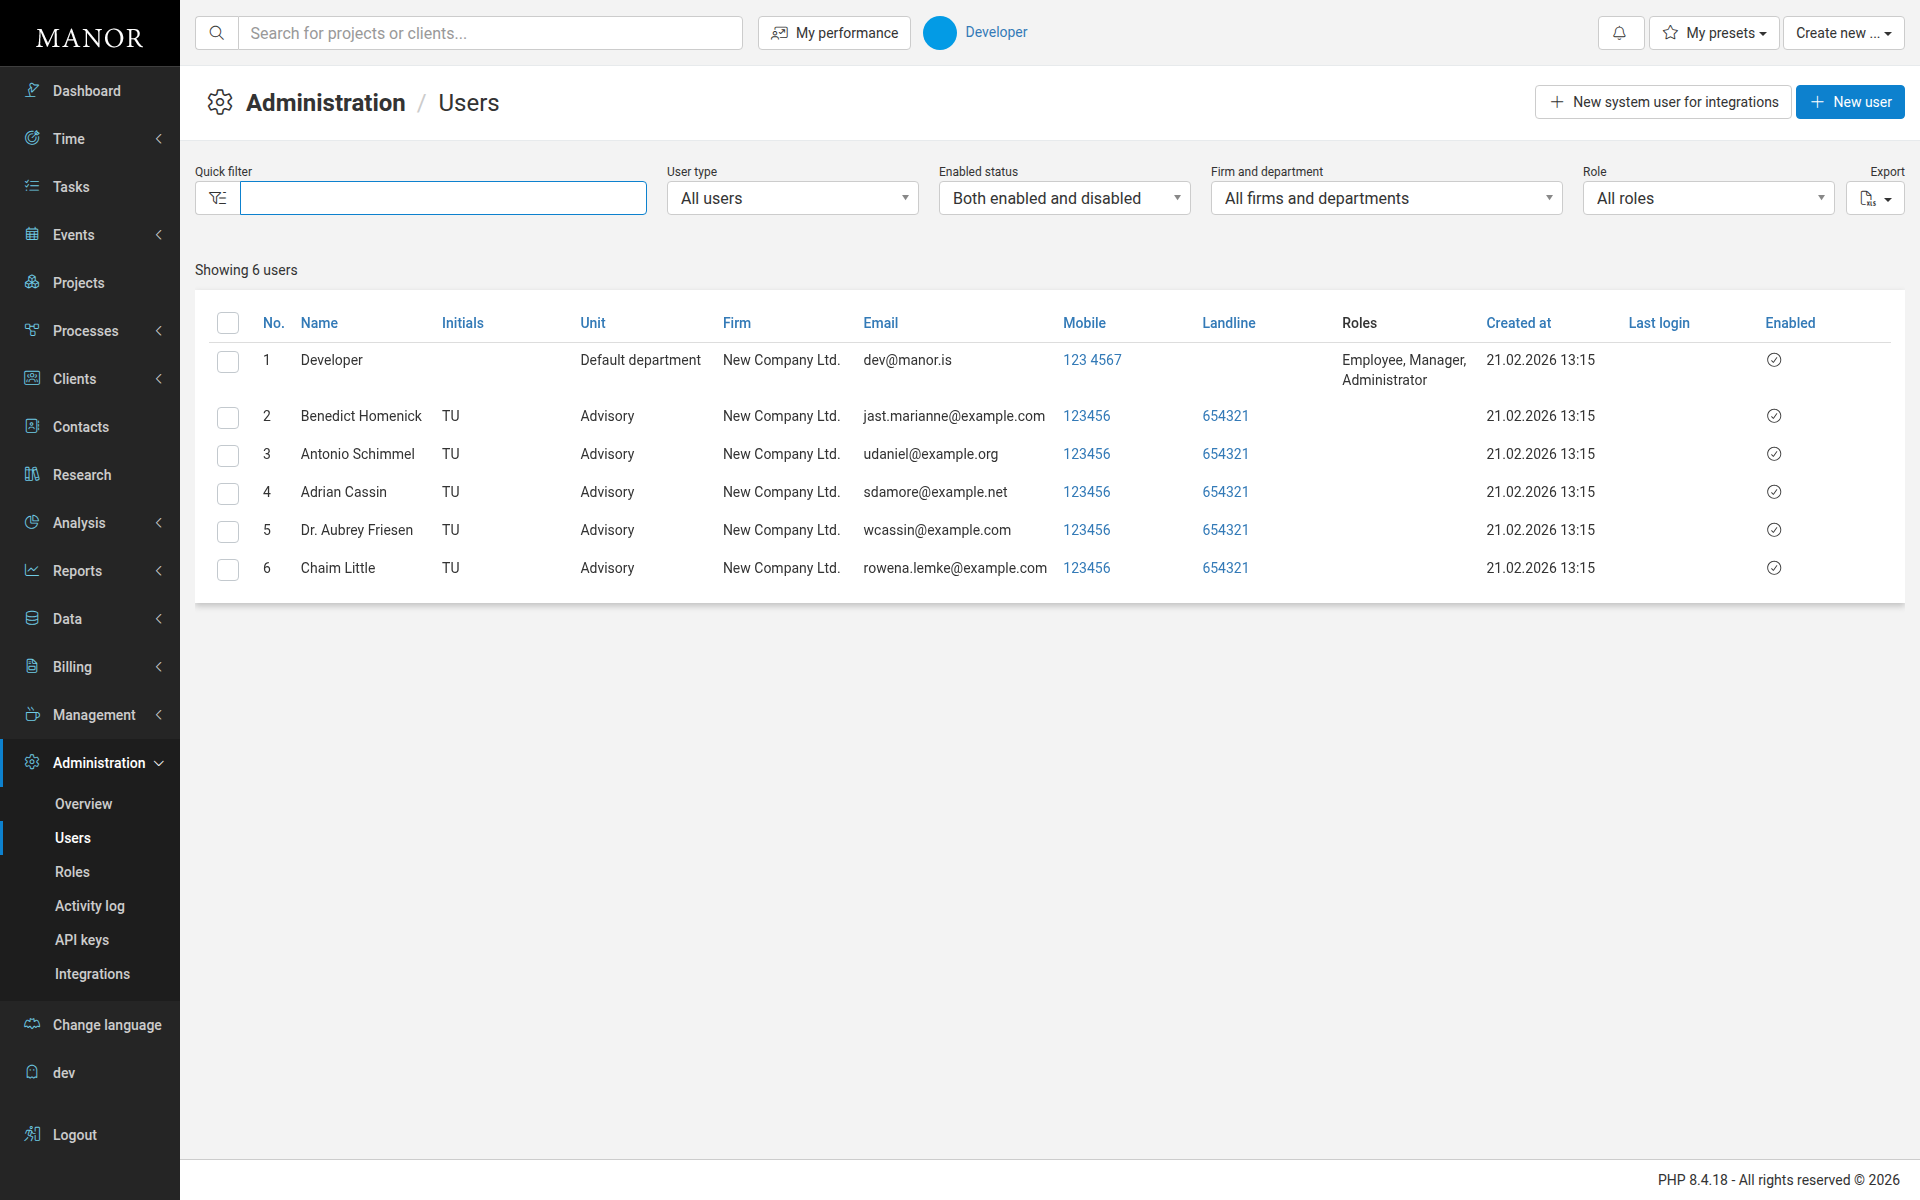
Navigate to Administration → Users.
-
Click the New user button in the top right.
Next to it, the New system user for integrations button opens the System Users page and creates a non-human account for integrations instead of a regular staff user. See System Users.
-
Fill in user details in the form that appears:
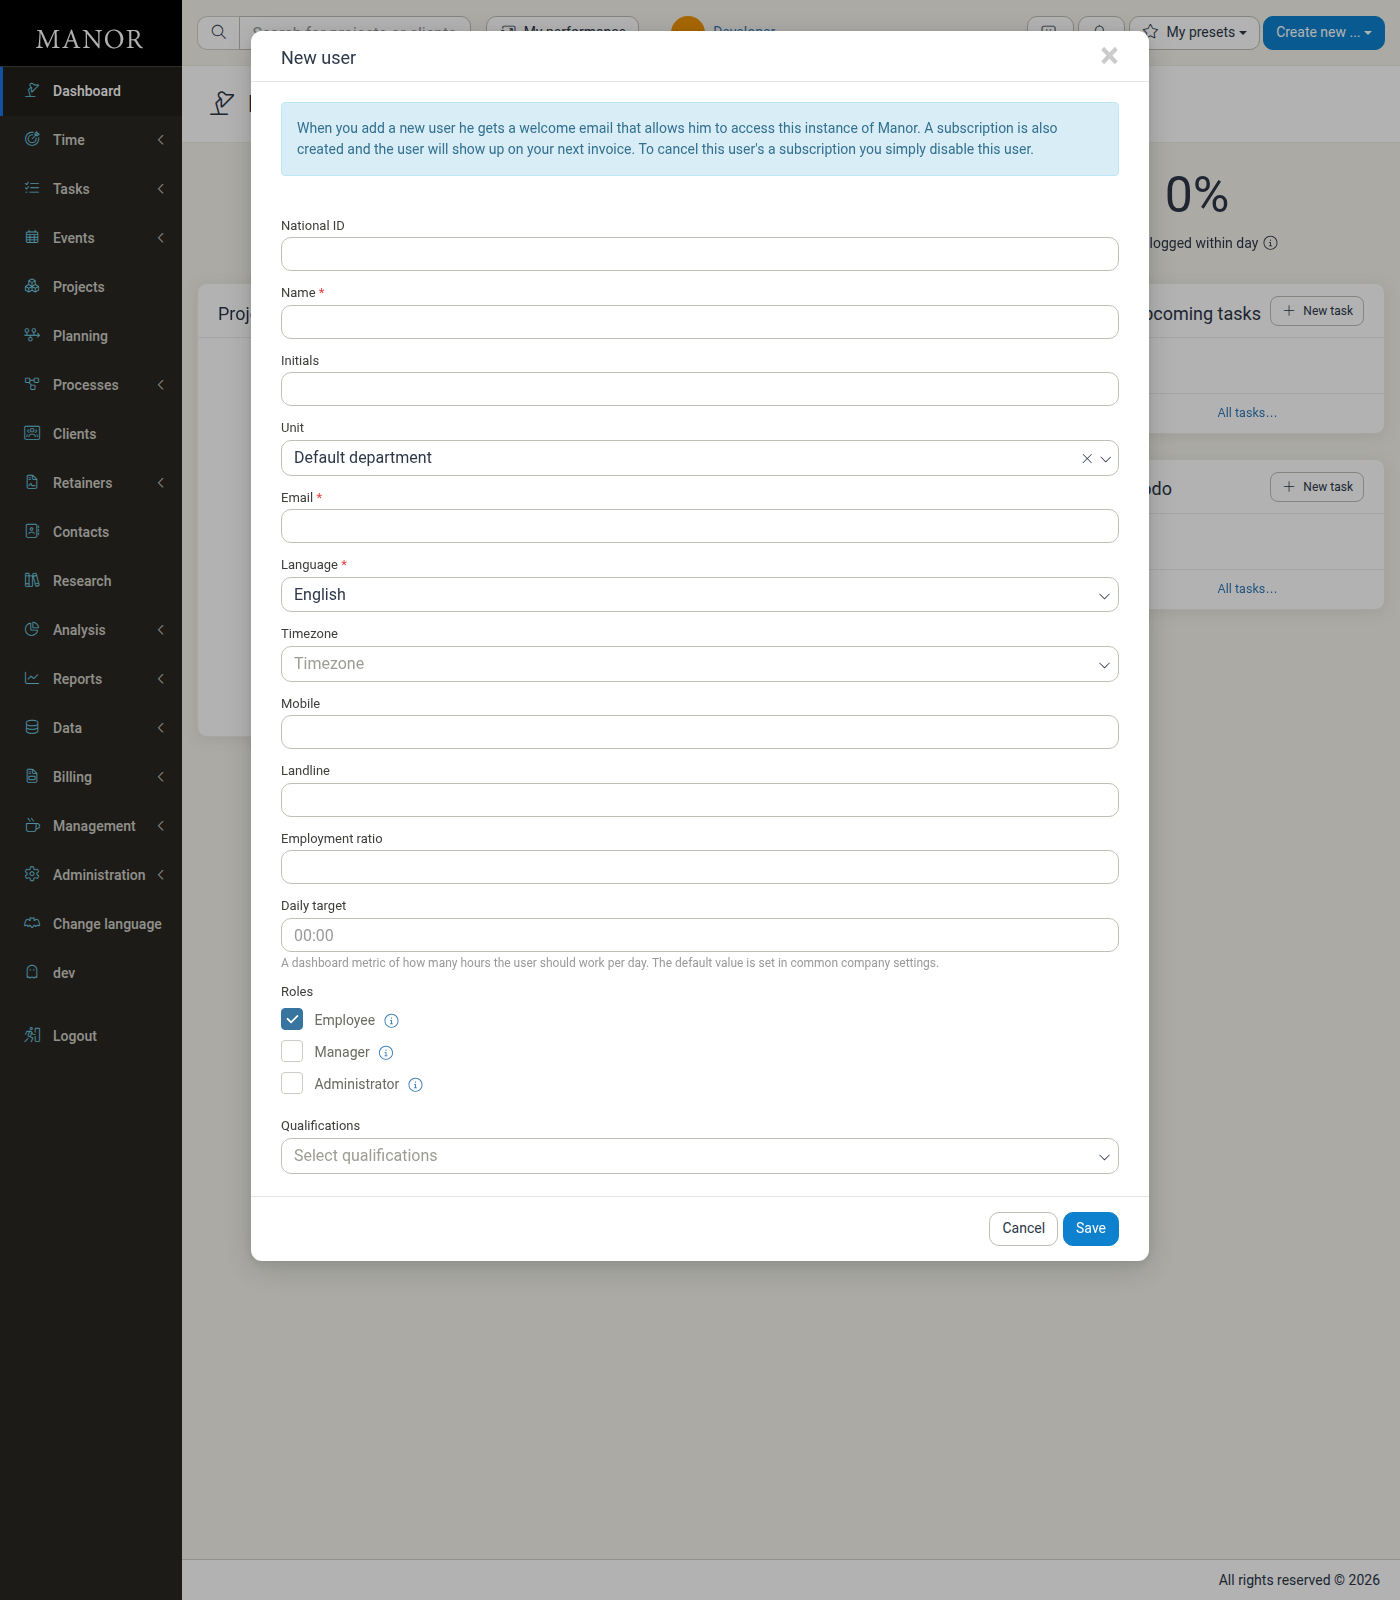
Required Fields:
- Name: Full name of the user
- Email: Email address for login and notifications
- Roles: At least one role must be selected (Employee is checked by default)
- Initial price: Starting hourly rate for the user (required field under Personal time rate section)
Important Fields:
- Unit: Organizational department assignment (optional)
- Language: User's interface language (defaults to English)
- Timezone: User's time zone
- Employment ratio: Percentage of full-time employment for payroll calculations
- Daily target: Target hours per day (placeholder shows 00:00; default set in company settings)
- Qualifications: Add relevant qualifications for the user
-
Configure optional contact details:
- National ID: National identification number
- Initials: User's initials
- Mobile: Mobile phone number
- Landline: Landline phone number
-
Configure personal time rate settings:
- Cost price: Cost price for resource planning
- Product number: The product code (vörunúmer) used when this user's time is invoiced (see Product Numbers for Users)
-
Click Save user at the bottom of the form.
Note: When you add a new user, they receive a welcome email that allows them to access this instance of Manor. A subscription is also created and the user will appear on your next invoice. To cancel a user's subscription, disable the user account. For non-human service accounts that do not incur subscription costs, see System Users.
Product Numbers for Users
A product number (also called an item code or, in Icelandic, vörunúmer) is the code your accounting software uses to identify what is being sold. Manor sends a product number with every invoice line, so the accounting software can book the sale against the right item. Days and hours that users log are invoiced as time, so the product number for time matters.
A user does not have a product number of its own. Instead, the hours a user logs are billed at a rate, and the product number comes from that rate. You can control it in two ways:
- Personal time rate (per user) - When the personal rate feature is enabled, each user has a personal time rate, and this form's Personal time rate section (Initial price, Cost price, Product number) belongs to that personal rate. The Product number you enter here applies to the time invoiced under that user's personal rate. If you leave it empty, Manor uses the default product number for time.
- The user's rate (per rate or department) - If the user is not on a personal rate, their time is billed at whichever rate applies (for example a standard time rate). The product number then comes from that rate, or from a department-specific product number. Rates and their product numbers are managed under Management → Pricing; the fallbacks for all types are set under Management → Pricing → Settings (the Rate settings page).
Note: The Personal time rate section (including its Product number field) is shown on the user form only when the personal rate feature is enabled. The personal rate setting is under Management → Pricing → Settings. When it is off, the user's rate is chosen from the standard rates instead, and the product number comes from those rates.
Why product numbers matter
Accounting integrations such as DK and Regla require a product number on every invoice line. If a required product number is missing, Manor does not post the invoice and warns you, for example:
This setting has not been set yet: Product number for time
Set the product numbers before you invoice. See Connecting to DK, Connecting to Regla, and Pricing Management for the full details.
What You Can Do with Users
Assign Roles
Control what each user can see and do through role-based permissions.
Manage Flextime
Set overdraft limits, maximum balances, and starting balances for time tracking.
Connect External Services
Integrate with Box, Outlook, and Google for seamless workflows.
Track Employment
Manage departments, levels, and employment ratios.
Important User Fields
Name The user's full name for identification and reporting.
Email Used for login, notifications, and password resets.
Role Determines system permissions and access levels. Standard roles include Employee, Manager, and Administrator.
Unit Organizational unit (department) the user belongs to.
Level Seniority level for resource allocation and reporting. Levels are managed under Management → Levels. Level is not part of the New user form.
Employment Ratio Percentage of full-time employment for payroll calculations.
Daily Target Target hours the user should work per day.
Initial Price The hourly rate used for billing and reporting.
Product Number The product code that identifies the user's time to your accounting software. It belongs to the user's personal time rate (when the personal rate feature is enabled); otherwise it comes from whichever rate the user's time is billed at.
Finding and Managing Users
Finding Users
Use the filters on the Users list page to find users by:
- Quick filter — Search by name or other text
- User type — Filter by user type (all users, staff users, system users, etc.)
- Firm and department — Filter by organizational unit
- Enabled status — Show enabled, disabled, or both
- Role — Filter by assigned role
Editing Users
- Click on the user's name in the list
- Update details as needed
- Click Save
Enabling/Disabling Users
Users can be enabled or disabled from the user list table. View the Enabled column to see which users are active. Disabling a user cancels their subscription.
Using User Data for Success
Access Control
Ensure users have appropriate permissions for their roles.
Time Tracking
Associate time entries with the correct users for accurate reporting.
Payroll Integration
Employment data flows into payroll calculations.
Team Management
Understand team composition by department and level.
Best Practices
Use Official Email Addresses Assign email addresses that match your organization's domain.
Assign Appropriate Roles Give users only the permissions they need for their job function.
Manage User Status Disable accounts promptly when users leave to prevent unauthorized access and stop subscriptions.
Set Appropriate Daily Targets Configure daily work hour targets for accurate time tracking and reporting.
Document Role Changes Track when user permissions change for audit purposes.
Review User Access Regularly Periodically review user roles and permissions to ensure they still match job responsibilities.
Set product numbers for time Make sure the product number for time is set (either on each user's personal time rate or as the default under Management → Pricing → Settings) so DK and Regla can post invoices that contain time.