
Introduction
A rate is a standard price Manor uses to bill a piece of work, a product, or an allowance. Every rate belongs to one of four rate types — Time, Travel, Product, or Per diem — and carries the baseline (Initial price) that applies everywhere in Manor unless a more specific price or discount overrides it.
The Rates page is the master list of these rates. Use it to create the rates your firm bills with, keep their cost prices and product numbers up to date, and deactivate the ones you no longer use. Other pricing tools build on top of what you set up here:
- Pricing periods change a rate's price from a specific date forward, without rewriting entries already logged.
- Cost pricing periods update a rate's internal cost across periods.
- Client, project, and activity prices and discounts override a rate for a specific scope.
- Price monitoring shows where rates are being overridden.
To understand how Manor chooses between all of these, see Understanding Prices.
Before you start
- You reach the Rates page from Management > Pricing. The Pricing area opens on Rates.
- Configuring rates, rate categories, and pricing periods requires the Can manage rates permission. Viewing published rate cards and price reports requires Can view published prices. See Custom Role Permissions for details.
- Rates are entered in one currency at a time. Use the currency selector at the top right of the page to switch currency; the prices shown are the rates for that currency.
The Rates page
Open Management in the main menu and select Pricing. The page opens on Rates, with the other pricing pages listed to the left of the table.
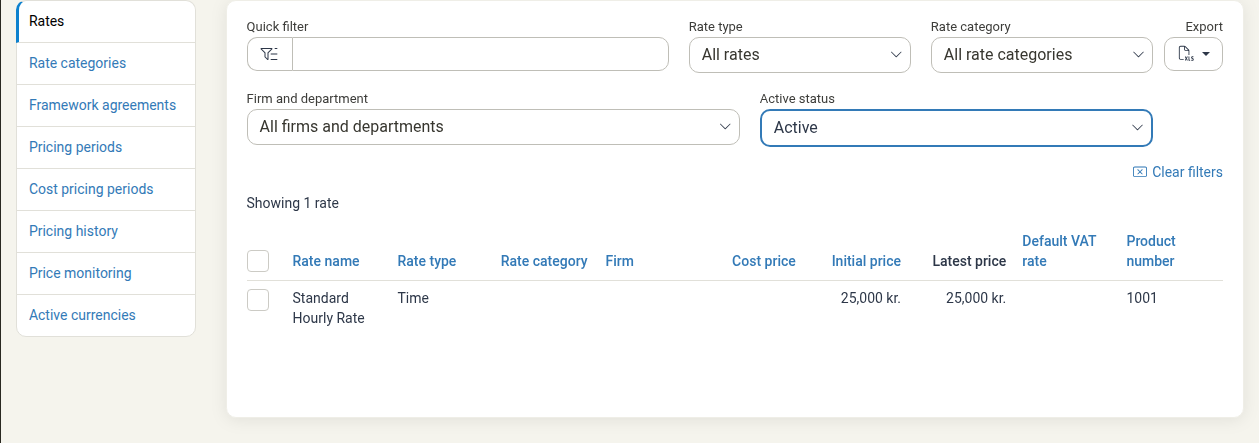
At the top right of the page you find:
- A currency selector — switch between the currencies your firm has enabled.
- Settings — opens the firm-wide Rate settings page (personal time rate, framework agreements toggle, and default product numbers). See Pricing Setup.
- New rate — opens the new rate form.
Columns
| Column | What it shows |
|---|---|
| Rate name | The name of the rate. Click it to open the rate for editing. |
| Rate type | Time, Travel, Product, or Per diem. |
| Rate category | The optional category the rate is grouped under. |
| Firm | The firm the rate is restricted to, if any. Blank means it is available to everyone. |
| Cost price | The internal cost of the rate (used for profitability analysis). |
| Initial price | The rate's baseline billing price. |
| Latest price | The most recent price set through pricing periods. |
| Default VAT rate | The VAT rate applied to this rate, where relevant. |
| Product number | The code used when the rate is posted to your accounting software. |
Note: A Personal rate column appears in the list only when personal time rates are in use (see Pricing Setup). When it is shown, it marks the rates that belong to a specific user.
Filtering and finding rates
Use the filters above the table to narrow the list:
- Quick filter — search by rate name.
- Rate type — show only one rate type, or All rates.
- Rate category — show only one category, or All rate categories.
- Firm and department — show rates for one firm or department, or all.
- Active status — Active (the default), Inactive, or Both active and inactive.
- Clear filters — resets every filter.
Click a column heading to sort the list, and use Export to download it as an Excel spreadsheet.
Creating a rate
-
On the Rates page, click New rate.
-
Fill in the form. Fields marked with an asterisk are required.
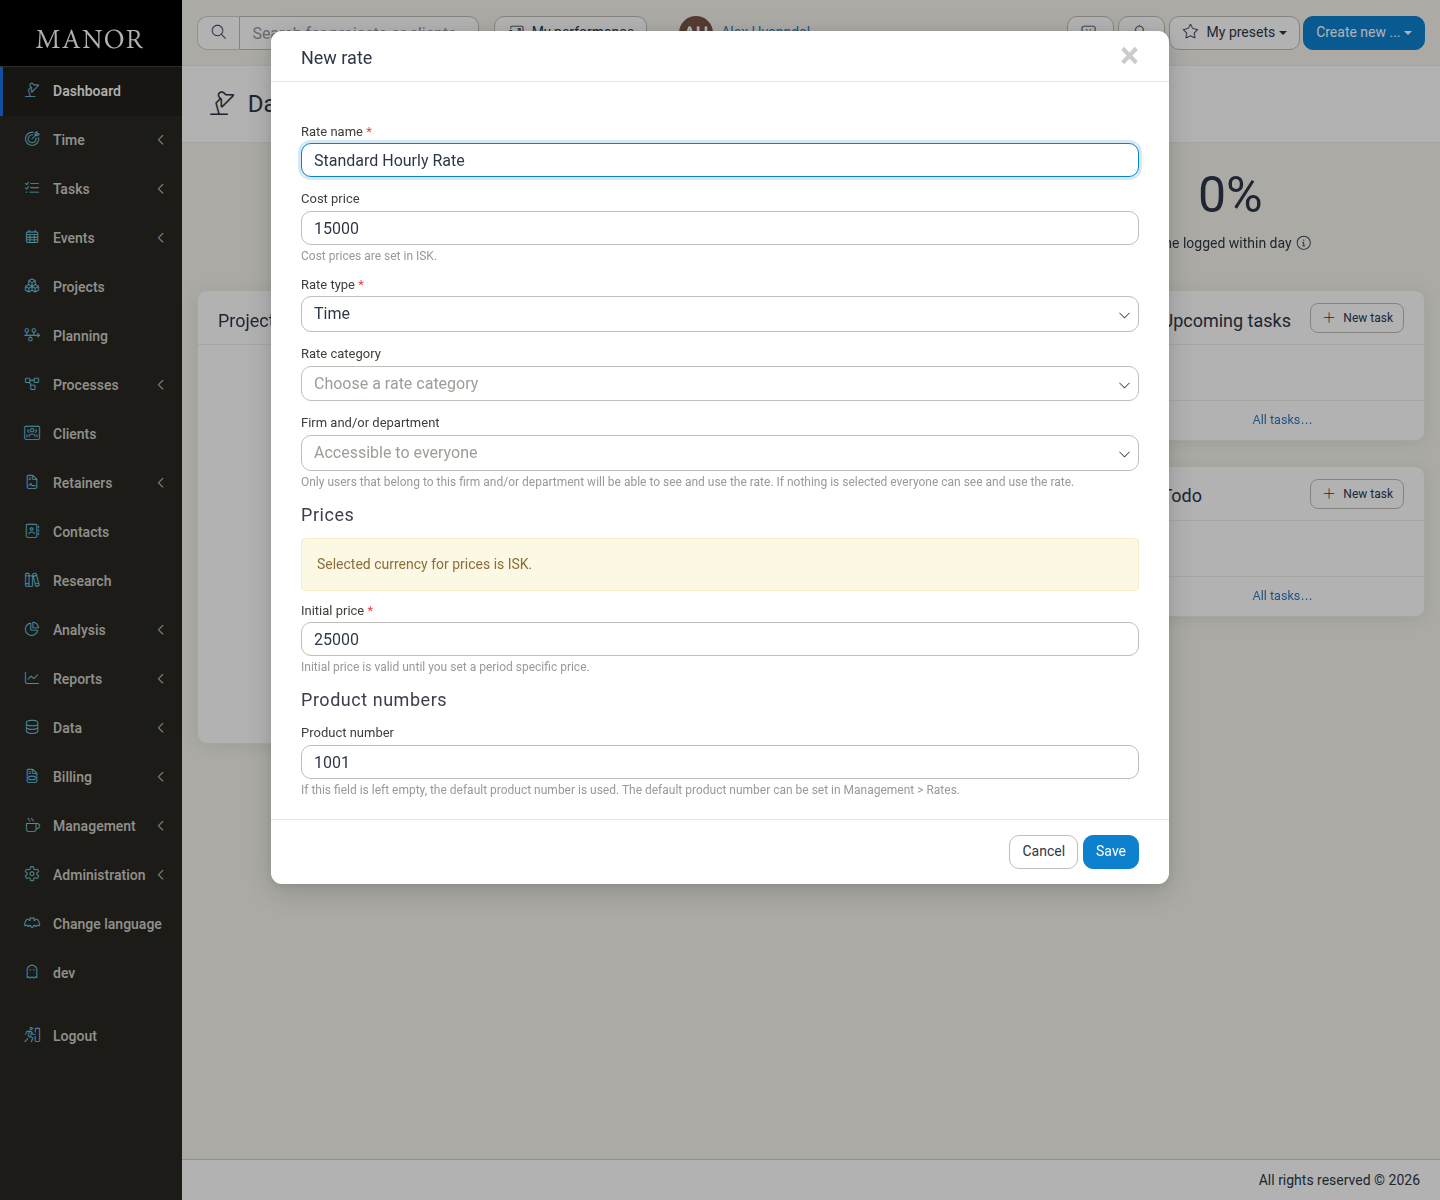
- Rate name * — a clear, descriptive name, for example Standard Hourly Rate or Senior Consultant.
- Cost price — the internal cost of the rate. The helper text reminds you which currency the cost is entered in (for example Cost prices are set in ISK.). Leave it empty if you do not track cost on this rate.
- Rate type * — Time, Travel, Product, or Per diem.
- Rate category — optionally pick a category to group the rate (see Rate Categories).
- Firm and/or department — optionally restrict who can see and use the rate. The default, Accessible to everyone, means anyone can use it. The helper text explains: Only users that belong to this firm and/or department will be able to see and use the rate. If nothing is selected everyone can see and use the rate.
- Initial price * — the baseline billing price. The helper text notes: Initial price is valid until you set a period specific price.
- Product number — the code used when this rate is posted to your accounting software. If you leave it empty, Manor uses the default product number for the rate type; the helper text points to where that default is set.
Depending on the Rate type you choose, extra fields appear:
- Travel rates also have a Travel rate type (for example per distance or per trip).
- Travel and Product rates also have a VAT rate field, labelled Choose an alternative VAT rate to override default behavior. Leave it unselected for normal VAT handling.
-
Click Save.
The rate is created and appears in the list. Only active rates are available when users log billable entries.
Editing a rate
-
Click the rate's name in the list, or click the row.
-
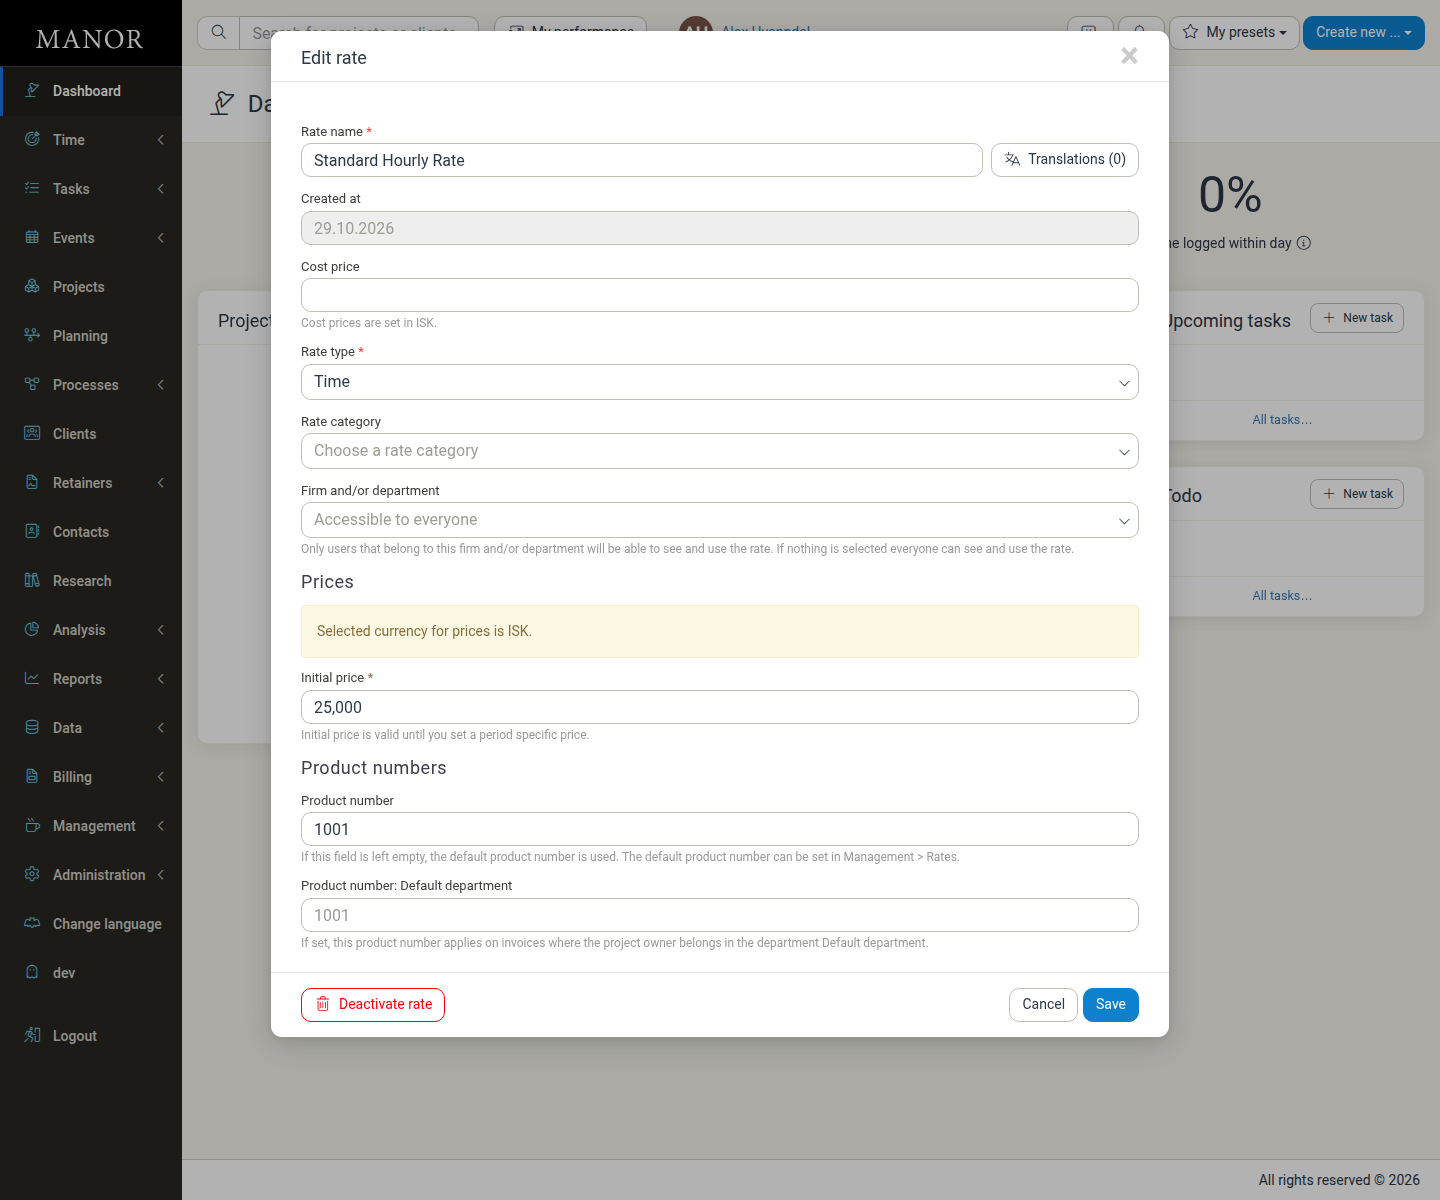
The Edit rate form opens with the same fields as the new rate form.
-
Change the fields you need and click Save.
The edit form adds:
- Created at — a read-only date showing when the rate was created.
- Translations (0) — opens the translations for the rate name, if your firm works in more than one language.
- Product numbers — a Product number field for the rate, plus a Product number:
override that applies on invoices where the project owner belongs to that department.
Tip: Editing a rate does not change entries that have already been logged or invoices already issued — they keep the rate that applied when they were created. Changes affect new entries.
Deactivating rates
Rates are not usually deleted, because historical entries and invoices still refer to them. Instead, deactivate a rate you no longer use:
- From the edit form — open the rate and click Deactivate rate at the bottom left of the form.
- From the list — select one or more rates with the checkboxes to the left of the table, then use the bulk action bar.
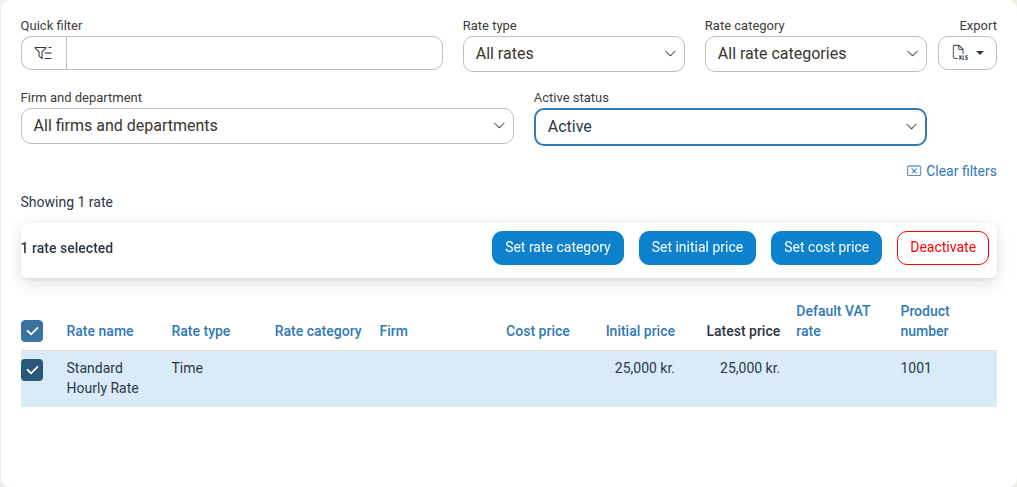
The bulk action bar appears when at least one rate is selected and offers:
- Set rate category — assign the selected rates to a rate category in one step.
- Set initial price — set the same initial price on several rates at once.
- Set cost price — set the same cost price on several rates at once.
- Deactivate — deactivate all selected rates.
A deactivated rate no longer appears when users log billable entries, but it stays in the list. To see and manage deactivated rates, set Active status to Inactive or Both active and inactive.
Related documentation
- Pricing — Overview of the Pricing section and the recommended setup order.
- Pricing Setup — The firm-wide Rate settings page, including personal time rates and default product numbers.
- Rate Categories — Grouping rates into categories.
- Pricing Periods — Changing a rate's price from a specific date forward.
- Cost Prices — Setting the internal cost of a rate.
- Cost Pricing Periods — Updating cost prices across scheduled periods.
- Pricing History — Reviewing the initial (baseline) price of every rate.
- Price Monitoring — Tracking special prices and discounts across clients and projects.
- Framework Agreements — Client contracts with standard rates and assigned staff.
- Discounts — Applying percentage and fixed discounts on clients, projects, and activities.
- Understanding Prices — How Manor resolves the price of a billable and where product numbers live.
- Pricing Management — Managing rates from the Management area.
- Custom Role Permissions — The Rates permissions and what they cover.