
Introduction
Project billing settings determine how work, expenses, and products associated with a project are billed to clients. Configuring these settings properly ensures accurate invoicing, protects firm revenue, prevents budget overruns with early warnings, and matches each client's invoicing preferences.
Whether handling standard hourly billing, non-billable pro bono cases, fixed-budget engagements, multi-client cost sharing, or retainer-backed work, project billing settings provide the controls needed to automate and manage client invoicing effectively.
Key Fields
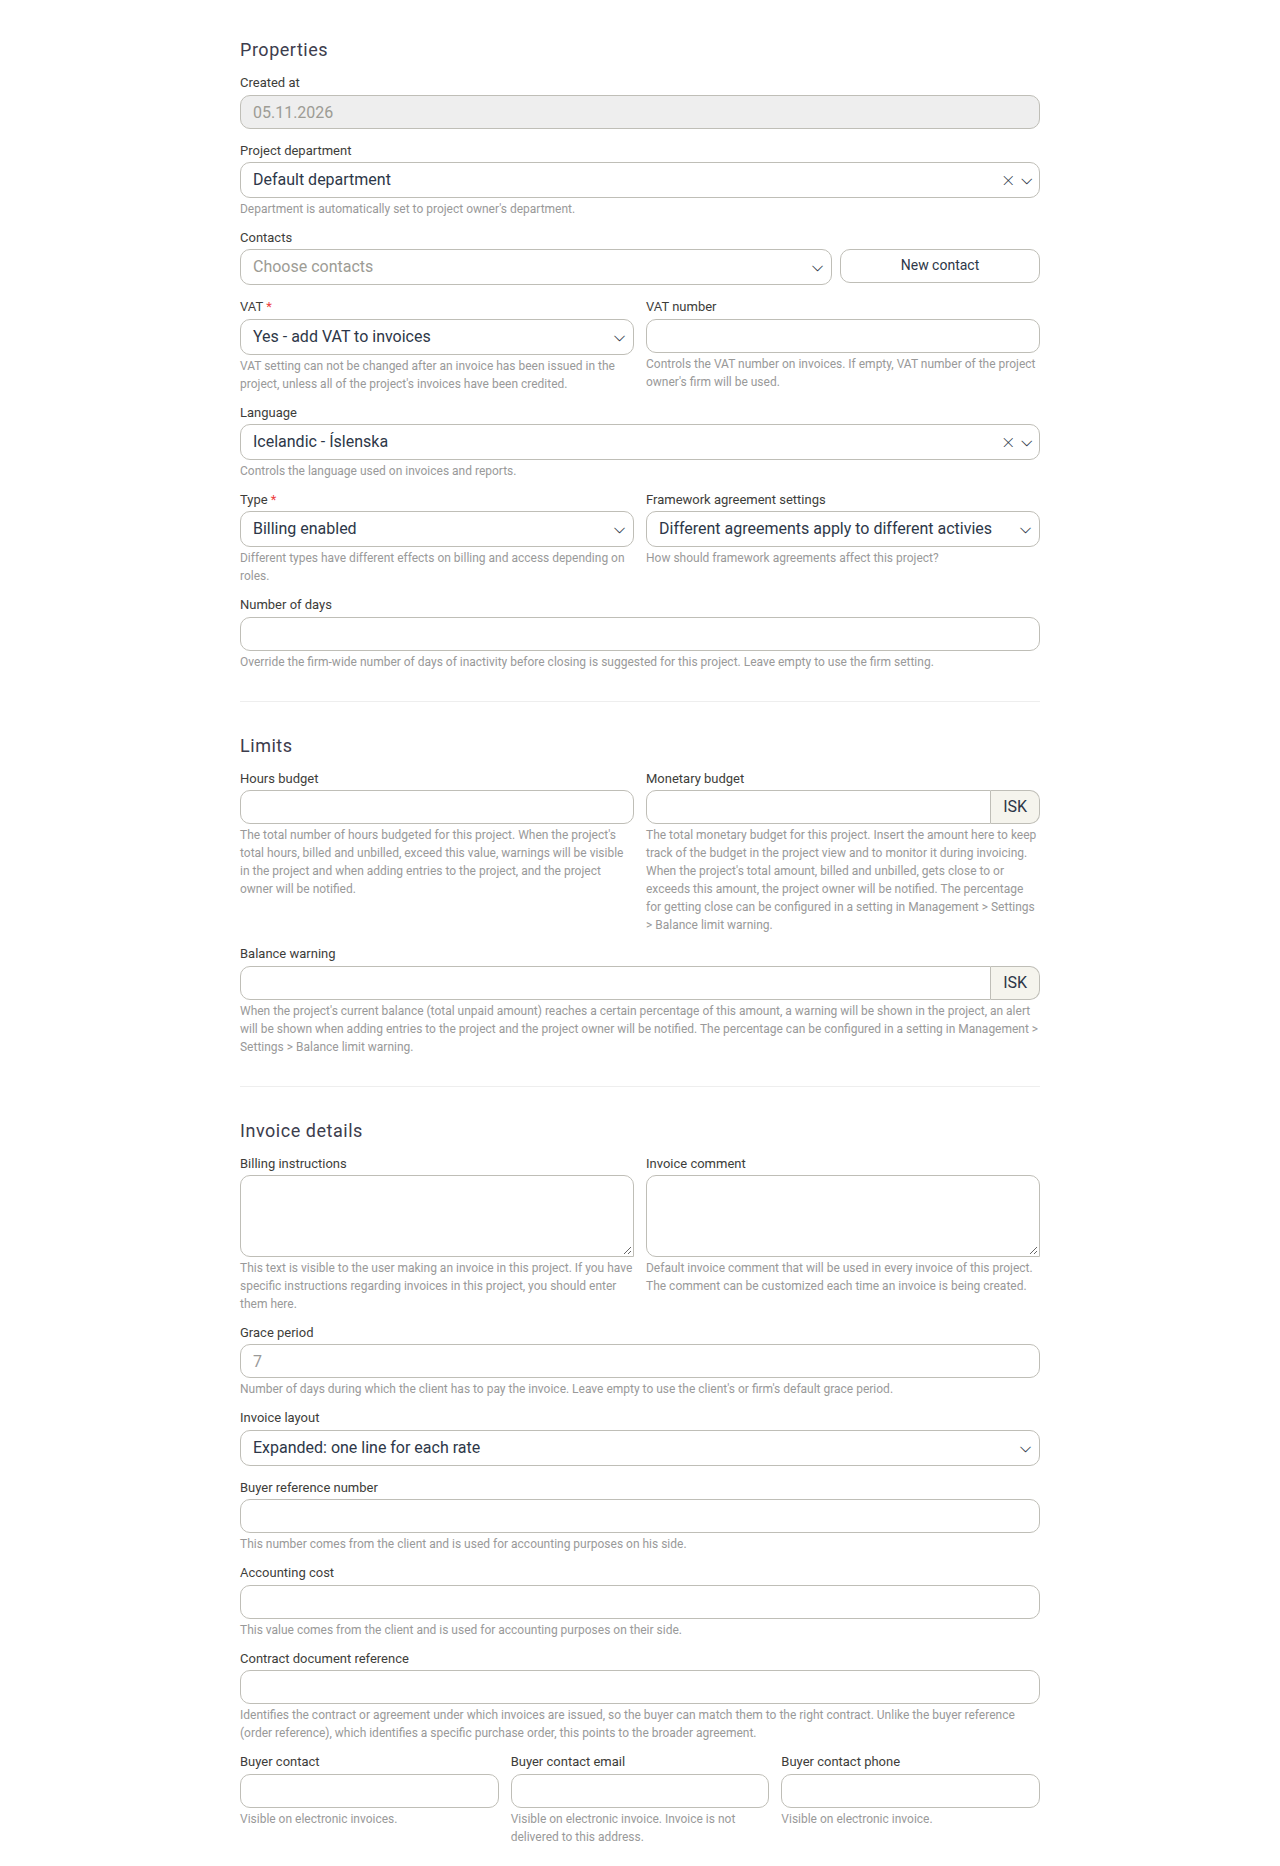
When configuring billing settings on a project, the following fields and controls are available:
Billing Type & Tax Properties
- Type — Determines whether work logged to the project is billable and how the project is classified. Options are:
- Billing enabled — Work, expenses, travel, and products logged to this project can be billed to the client.
- Internal project and Sensitive internal project — Internal, non-billable project types; work logged to them cannot be billed. The sensitive variant is subject to stricter access. Use these for administrative tasks, business development, or other non-billable matters. The field help notes that different types have different effects on billing and access depending on roles.
- VAT — Controls whether Value-Added Tax is applied to invoices generated for this project. Options are Yes - add VAT to invoices (the default) and No - do not add VAT to invoices. Once an invoice has been issued in the project, the VAT setting cannot be changed unless all of the project's invoices have been credited.
- VAT number — Controls the VAT number shown on invoices. If left empty, the VAT number of the project owner's firm is used.
- Language — Controls the language used on invoices and reports. The list includes English, Icelandic, Czech, French, Norwegian, Polish, Swedish and Danish. When a project is created the field is left empty so that the client's language is used by default.
Budgets & Warnings
- Hours budget — The total number of hours budgeted for the project. When the project's total hours (billed and unbilled) exceed this value, warnings appear in the project and when adding entries to it, and the project owner is notified.
- Monetary budget — The total monetary budget for the project, entered in the project's currency (for example ISK). Manor keeps track of it in the project view and monitors it during invoicing, and notifies the project owner when the total amount (billed and unbilled) approaches or exceeds it. The percentage that counts as approaching the budget is configured under Management > Settings > Balance limit warning.
- Balance warning — A monetary amount in the project's currency. When the project's current balance (total unpaid amount) reaches a certain percentage of this amount, a warning appears in the project, an alert is shown when adding entries to it, and the project owner is notified. The percentage is configured under Management > Settings > Balance limit warning.
Invoice Details
- Billing instructions — Free-text guidance that is shown to the user who is making an invoice in this project. Use it to pass on project-specific invoicing instructions (for example, special billing rules, references to include, or steps the biller must follow). It is displayed while the invoice is being created and is not printed on the invoice itself. It is distinct from the Invoice comment (see Billing instructions vs. Invoice comment).
- Invoice comment — A default comment that is printed on every invoice generated for this project (for example, payment details, a milestone description, or a required reference). It can be overridden on individual invoices.
- Grace period — The number of days during which the client has to pay the invoice. Leave empty to use the client's or firm's default grace period (see Grace period).
- Invoice layout — Controls how invoice lines are grouped. Options include Expanded: one line for each entry, Expanded: one line for each rate, Expanded: one line for each user, Expanded: one line for each activity, and Condensed: one line for all entries.
- Buyer reference number — The client's purchase order number, cost center, or accounting reference code required by the client's accounts payable department.
- Accounting cost — The client's accounting cost/internal code, supplied by the client and used for accounting purposes on their side. It is a separate field from the Buyer reference number (see Accounting cost vs. Buyer reference number).
- Contract document reference — Identifies the contract or agreement under which invoices are issued, so the buyer can match them to the right contract. Unlike the buyer reference, which identifies a specific purchase order, this points to the broader agreement.
- Buyer contact — The name of the client's contact person that appears on electronic invoices.
- Buyer contact email — The email address of the buyer contact (used on electronic invoices; does not replace the client invoice delivery email).
- Buyer contact phone — The phone number of the buyer contact, shown on electronic invoices.
Special Billing Arrangements
- Framework agreement settings — Determines how contracted framework rates apply to the project (e.g., whether a single agreement covers the entire project or different agreements apply to different activities).
- Prices & Discounts — Specific hourly rates or percentage discounts configured directly on the project that override client-level and firm-wide list prices.
- Invoice Splits — Allocating percentage shares of all project billing among multiple clients.
- Payer Preferences — Designating alternative client entities for specific items or activities.
- Automated Invoices — Scheduled automatic generation of invoices on a chosen date (for example the first or last day of the month) for all unbilled work.
- Retainer Coverage — Linking the project to pre-paid client retainers so billable work automatically draws down the retainer balance.
Understanding the Invoice Detail Fields
Three of the fields under Invoice details are easy to confuse with other, similar fields. The sections below explain what each one does and how it differs from the field it is most often mistaken for.
Billing instructions vs. Invoice comment
Both fields live under Invoice details and both relate to how an invoice is prepared, but they are used at different stages and appear in different places.
- Billing instructions is guidance for your own staff who prepare the invoice. Manor shows the text to the user making an invoice in this project, so it works like a note pinned to the project during billing. Use it for internal, procedural, or project-specific reminders (for example, "Bill the travel in a separate line" or "This project must always be split 50/50"). Because its purpose is to instruct the biller, it is not intended to be printed on the invoice.

- Invoice comment is text for the client, printed on every invoice generated for the project (for example, payment terms, bank account details, or a greeting). It can be customised on each individual invoice, while the project value acts as the default.
In short: Billing instructions tells the biller what to do, while Invoice comment is what appears on the invoice the client receives.
Grace period
Grace period sets the number of days during which the client has to pay invoices for this project. It directly drives the invoice due date: when you create an invoice, Manor suggests a due date based on the grace period (from the project, the client, or the firm).
Leave the field empty to fall back to the defaults, in this order:
- The client's default grace period, if one has been set on the client record.
- The firm's default grace period, if the client has none.
Entering a value on the project overrides both, which is useful when a specific engagement has negotiated longer or shorter payment terms than usual. You can still change the due date on an individual invoice when you create it.

Accounting cost vs. Buyer reference number
Both fields come from the client and both are intended for accounting, so they are frequently mixed up. They are, however, separate fields that carry different codes.
- Buyer reference number is the client's purchase order number (or similar accounting reference) that the client's accounts payable department requires in order to match and approve the invoice.
- Accounting cost is the client's accounting cost code, used for accounting purposes on the client's side (for example, to allocate the expense internally).
Both are supplied by the client and both are recorded on the project so they can be carried onto the invoice, but the buyer reference identifies the order or commitment, whereas the accounting cost identifies the cost centre or account allocation.

Configuring Project Billing Settings
Editing Project Billing Properties
To configure basic billing properties and invoice details for an existing project:
-
Navigate to Projects from the main menu and select the project.
-
Click the Edit project button in the project overview header.
-
In the project editing form, review and update the basic fields:
- Ensure the project Client is set correctly, as the client determines billing currency and default payment terms.
- The billing fields are grouped under the Properties, Limits, and Invoice details headings further down the form.
-
Adjust billing type and tax options:
- Set Type to Billing enabled for billable engagements, or choose an internal type for non-billable work.
- Choose the appropriate VAT option and enter a VAT number if required.
- Set the document Language.
-
Configure budgets and warnings:
- Enter an Hours budget to monitor team time consumption.
- Enter a Monetary budget to track spending against the agreed project total.
- Enter a Balance warning amount to be notified when the unpaid balance approaches it.
-
Configure invoice details:
- Enter Billing instructions with any guidance the person raising the invoice needs (shown to them while they make the invoice; not printed on the invoice).
- Enter a default Invoice comment (e.g., contract references or bank details) that will be printed on the invoice.
- Set a Grace period in days, or leave it empty to use the client's or firm's default.
- Select the preferred Invoice layout.
- Fill in Buyer reference number, Accounting cost, Contract document reference, Buyer contact, Buyer contact email, and Buyer contact phone for client accounting compliance.
-
Click Save project to save your changes.
Managing Project Billing
Setting Project-Specific Prices and Discounts
When a project has negotiated pricing that differs from your firm's standard rates:
- Open the project page.
- Click the Prices button in the project header.
- In the pricing dialog:
- Fixed prices for each type — Enter fixed hourly, travel, product, per diem, or expense rates, or set an overall project discount percentage.
- Prices by rate — Set custom prices or specific discount percentages for individual rate items.
- Click Save prices.
Any custom prices or discounts set at the project level override client-level prices and firm standard rates for work logged to this project.
Configuring Invoice Splits
When multiple clients share responsibility for project costs:
- Open the project page.
- In the right sidebar, locate the Invoice split section and click New Split (or Edit split configuration if a split already exists).
- Click Add New Split to add co-paying clients and specify their percentage shares (totaling 100.00%).
- Configure optional buyer contact and buyer reference codes for each party.
- Click Save.
For details, see Invoice Splits and Multiple Payers on a Project.
Configuring Retainer Coverage
If the project is funded through a client retainer agreement:
- Open the project page.
- In the action bar, click Add project to a retainer.
- Select the active retainer agreement from the dialog.
- Click Save.
All billable time, expenses, and products recorded on the project will automatically deduct from the retainer balance instead of accumulating as regular unbilled balance.
Enabling Automated Invoicing
For projects with regular recurring billing schedules:
- Open the project page.
- Locate the Automated invoices card in the right sidebar.
- Click Edit invoice automation.
- Set Automated invoicing to Enabled.
- Choose the Invoice date (e.g., First day of month, Custom day of month, or Last day of month). If you choose Custom day of month, also set the required Day of month.
- Click Save.
The system will automatically gather all unbilled entries on the scheduled date and generate an invoice.
Monitoring Project Balances and Progress
- Balances — View unbilled hours, travel, expenses, and products directly on the project page or under Billing > New invoice (Balances modal).
- Progress Analysis — Open Progress analysis from the project menu to track logged hours against your Hours budget.
- Profit Analysis — Review earned revenue versus internal costs to monitor project profitability.
Best Practices
- Set warnings early — Define the Balance warning, Hours budget, and Monetary budget during project creation so project managers are alerted before overruns occur.
- Include buyer references upfront — Always enter the client's Buyer reference number and Accounting cost before issuing invoices to prevent payment rejections.
- Use billing instructions and invoice comments for different audiences — Put internal, procedural guidance in Billing instructions (for the biller) and client-facing text in Invoice comment (printed on the invoice).
- Only override the grace period when terms differ — Leave Grace period empty to inherit the client's or firm's default, and fill it in only when a project has special payment terms.
- Use clear invoice comments — Add recurring billing details, milestone descriptions, or required payment references to the default project Invoice comment.
- Verify project type before logging work — Ensure the project is set to Billing enabled prior to team members recording time, avoiding time entries defaulting to non-billable status.
- Check retainer links — Link projects to retainers at the start of an engagement so usage is drawn correctly from day one.
Related Documentation
- Project Creation — How to create a project with billing settings from the start
- Project Workflow Guide — Complete lifecycle guide from project setup through final billing
- Project Retainer Coverage — Linking projects to client retainer agreements
- Invoice Splits — Dividing project billing across multiple clients by percentage
- Multiple Payers on a Project — Recording and supporting several payers on one project (splits, payer preferences, and per-entry payers)
- Automated Invoices — Configuring scheduled recurring invoice generation
- Balances Overview — Viewing and managing outstanding billable balances
- Discounts — Configuring client, project, and activity discounts and surcharges
- Understanding and Managing Prices — How project prices fit into Manor's pricing hierarchy
- Framework Agreements — Setting up contracted client rates