
What are Templates?
Templates are blueprints for creating new projects with consistent structure and configuration. They define which custom fields should be included in projects created from the template, along with process settings and initial state. Using templates ensures standardized project setup and makes it faster to create new projects with the right structure and fields.
Why Templates Matter
Templates help you:
- Standardize project structure - Ensure all projects of a similar type have the same fields and data
- Speed up project creation - Create projects faster with pre-configured settings
- Ensure data consistency - Capture the same information for all projects of a type
- Support workflows - Set default processes and initial states for projects
- Reduce errors - Avoid forgetting important fields when setting up new projects
Key Concepts
Custom Fields
Templates can include custom fields that will automatically appear on all projects created from that template. Custom fields can be:
- Text - Simple text input fields
- Number - Numeric values for calculations
- Date - Date picker fields
Custom fields can be marked as Required to ensure they're always filled in.
Process and Initial State
Templates can be linked to a process (workflow) and specify which state new projects should start in. This ensures all projects follow the same workflow path.
Creating a Template
To create a new template:
-
Navigate to Management from the main navigation menu.
-
Click Templates.
-
Click the New template button in the top right.
-
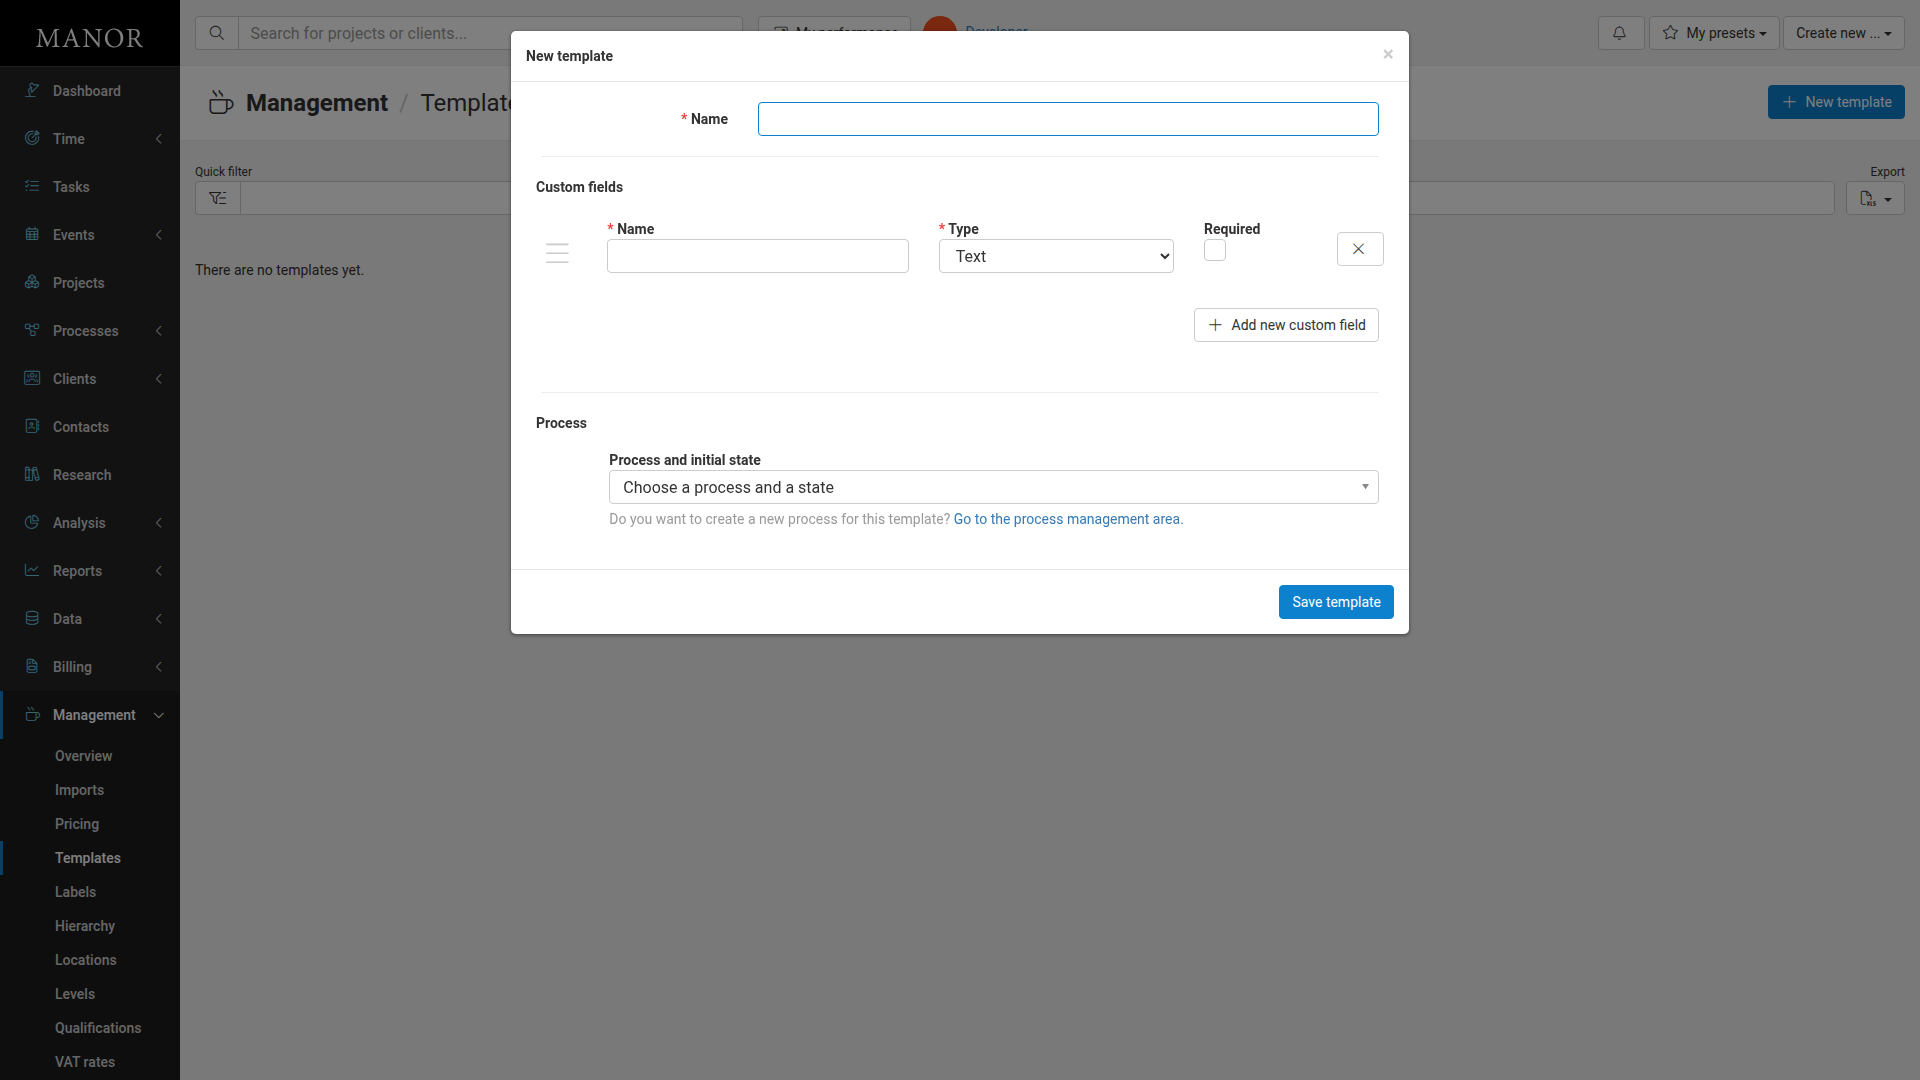
A dialog window opens. Enter a Name for your template (e.g., "Client Matter", "Internal Project", "Contract Review").
-
Add custom fields to your template:
- A custom field row appears with empty Name and Type fields
- Enter a field Name (e.g., "Project ID", "Case Number", "Budget")
- Select the field Type from the dropdown: Text, Number, or Date
- Check the Required checkbox if this field must be filled in
- Click the + Add new custom field button to add additional fields
- Repeat for each field you want to add
-
Configure the process (optional):
- Click the Process and initial state dropdown to select a process
- If you don't have a process yet, you can click Go to the process management area to create one
-
Click Save template to create the template.
Managing Templates
Viewing Templates
To view all templates in your system:
-
Navigate to Management → Templates.
-
You will see a list of all templates with their details.
Editing a Template
To edit an existing template:
-
Navigate to Management → Templates.
-
Click on the template name you want to modify.
-
Update the template name, custom fields, or process settings.
-
Click Save template to apply changes.
Note: Changes to templates only affect new projects created from the template. Existing projects are not affected.
Deleting a Template
To delete a template:
-
Navigate to Management → Templates.
-
Click on the template you want to delete.
-
Click the Delete button.
-
Confirm the deletion.
Using Templates to Create Projects
When you create a new project:
-
Go to Projects and click New project.
-
Select a template from the template dropdown.
-
The template's custom fields will automatically appear in the project form.
-
Fill in the custom fields and other project details.
-
Click Save to create the project.
-
The project will be linked to the template's process and start in the initial state (if configured).
Template Examples
Example 1: Financial Audit Template
An accounting firm might create a "Financial Audit" template with:
- Custom Fields:
- Audit ID (Text, Required)
- Industry (Text)
- Budget (Number)
- Due Date (Date, Required)
- Process: Linked to "Audit Workflow" process, starting in "Planning" state
Example 2: Internal Project Template
An organization might create an "Internal Project" template with:
- Custom Fields:
- Department (Text, Required)
- Budget (Number)
- Priority Level (Text)
- Target Completion Date (Date)
- Process: Linked to "Project Workflow" process, starting in "Planning" state
Example 3: Contract Review Template
A company might create a "Contract Review" template with:
- Custom Fields:
- Contract Type (Text, Required)
- Vendor/Client Name (Text)
- Value (Number)
- Review Date (Date, Required)
- Process: Linked to "Contract Process", starting in "Review" state
Best Practices
Use Descriptive Template Names
Choose names that clearly indicate what type of project the template is for:
- Good: "Client Project - Litigation", "Internal Project - HR"
- Avoid: "Template1", "Project", "New"
Plan Fields Carefully
Before creating a template, decide what information you need to capture:
- What fields are essential for every project of this type?
- What calculations or reports will you need?
- Which fields should be required vs. optional?
Use Required Fields Strategically
Mark fields as required only if they're absolutely essential. Too many required fields can slow down project creation.
Link to Processes
When possible, link templates to processes to automate workflow initialization and ensure consistency.
Keep Templates Focused
Create separate templates for different project types rather than one generic template. This helps maintain data quality and relevance.
Review and Update
Periodically review your templates and update them as:
- Your business processes change
- New information needs to be captured
- Templates become outdated or unused
Document Field Purposes
Use clear field names that are self-explanatory (e.g., "Hourly Rate" vs. "Rate").
Test Before Deploying
Create a test project using your new template to ensure all fields work as expected before using it for real projects.
Template Management Tips
- Use consistent naming conventions across all templates
- Create templates only for project types you use regularly
- Archive or delete templates that are no longer needed
- Communicate template availability to your team
- Train users on when to use each template