
What is Time Tracking?
Time tracking is how you record the hours you spend working on projects and activities. Accurate time tracking ensures proper billing, helps analyze productivity, and provides data for payroll and project profitability analysis.
Why Time Tracking Matters
Good time tracking helps you:
- Bill accurately - Ensure all billable work is invoiced to clients
- Analyze productivity - See where time is being spent across projects
- Track project budgets - Monitor hours against estimated budgets
- Process payroll - Provide data for employee compensation
- Make better estimates - Use historical data to price future projects
Accessing Time Tracking
To access time tracking:
-
Navigate to the Time section from the main menu.
-
Choose your preferred view:
- Day: View and log time for a specific day
- Week: See your entire week at a glance
- Month: Monthly overview of logged time
- Table: List view of all time entries
- All billables: View all billable items across projects
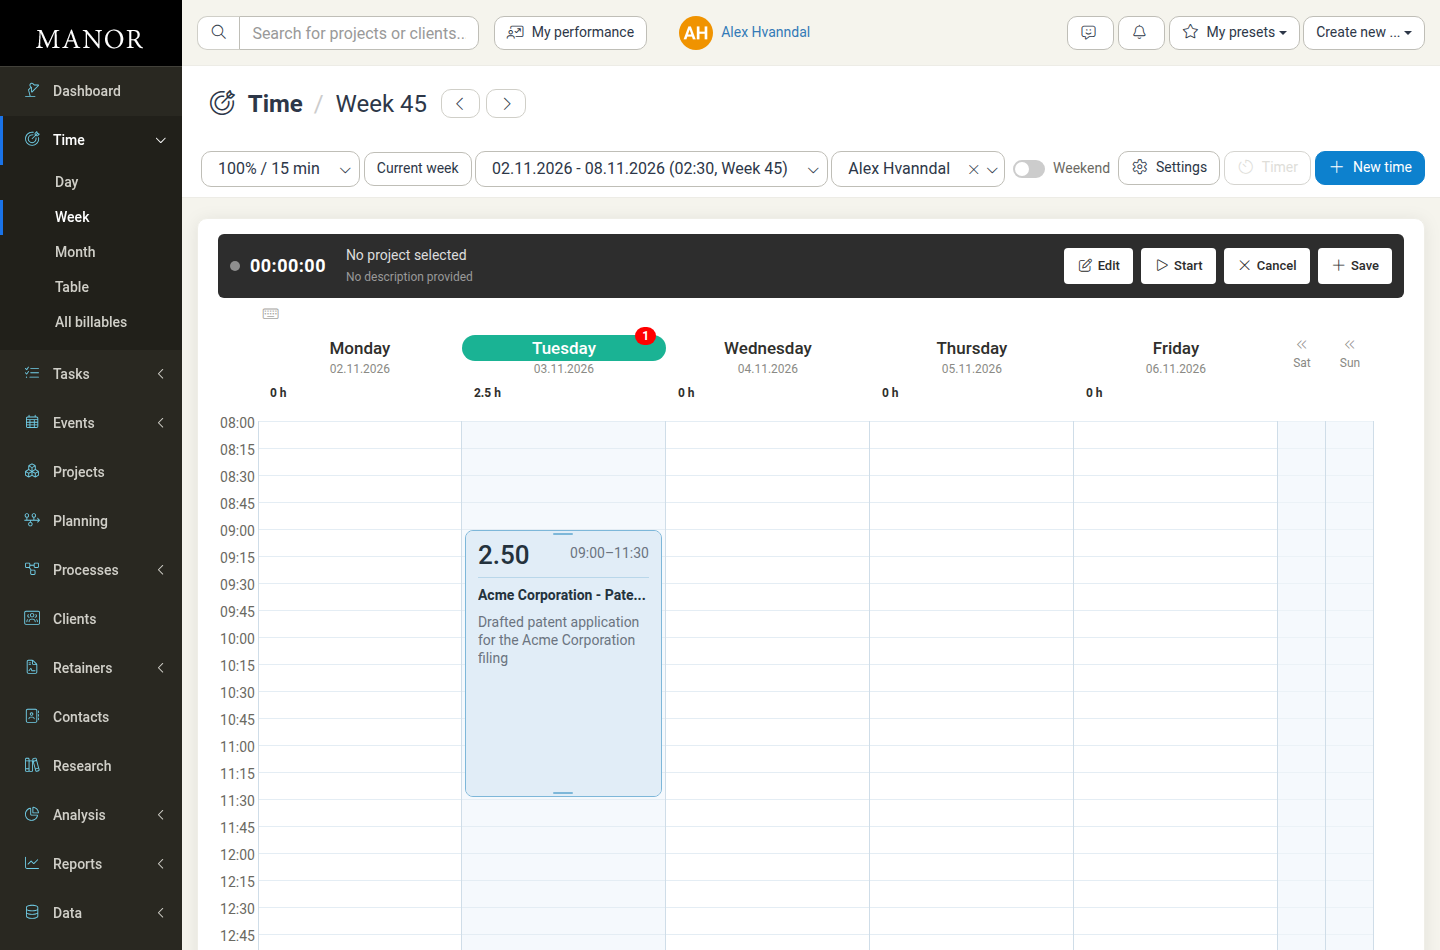
The Week view displays the current week with days as columns and time slots as rows (in 15-minute increments by default), allowing you to see all time entries at a glance and quickly identify how your hours are distributed.
Creating Time Entries
Using the New Time Button
-
From any time view, click the New time button in the top right.
-
A dialog opens with these fields:
- Project - Select the project this time belongs to (required)
- Activity - The type of work performed. Shown when the selected project has one or more activities
- Date - The date when the work was performed (required; defaults to today)
- Begins and Ends - Start and end time (required)
- Duration - Automatically calculated from the Begins and Ends times
- Billable hours - The number of hours to bill; defaults to the duration but can be adjusted
- Description - Details about the work performed; shown on invoices and work reports
- Internal note - Notes not visible on invoices or work reports
- Payer - Who to invoice (defaults to Same as client)
- Rate - The billing rate applied to the entry (required)
- User - Who performed the work (defaults to you)
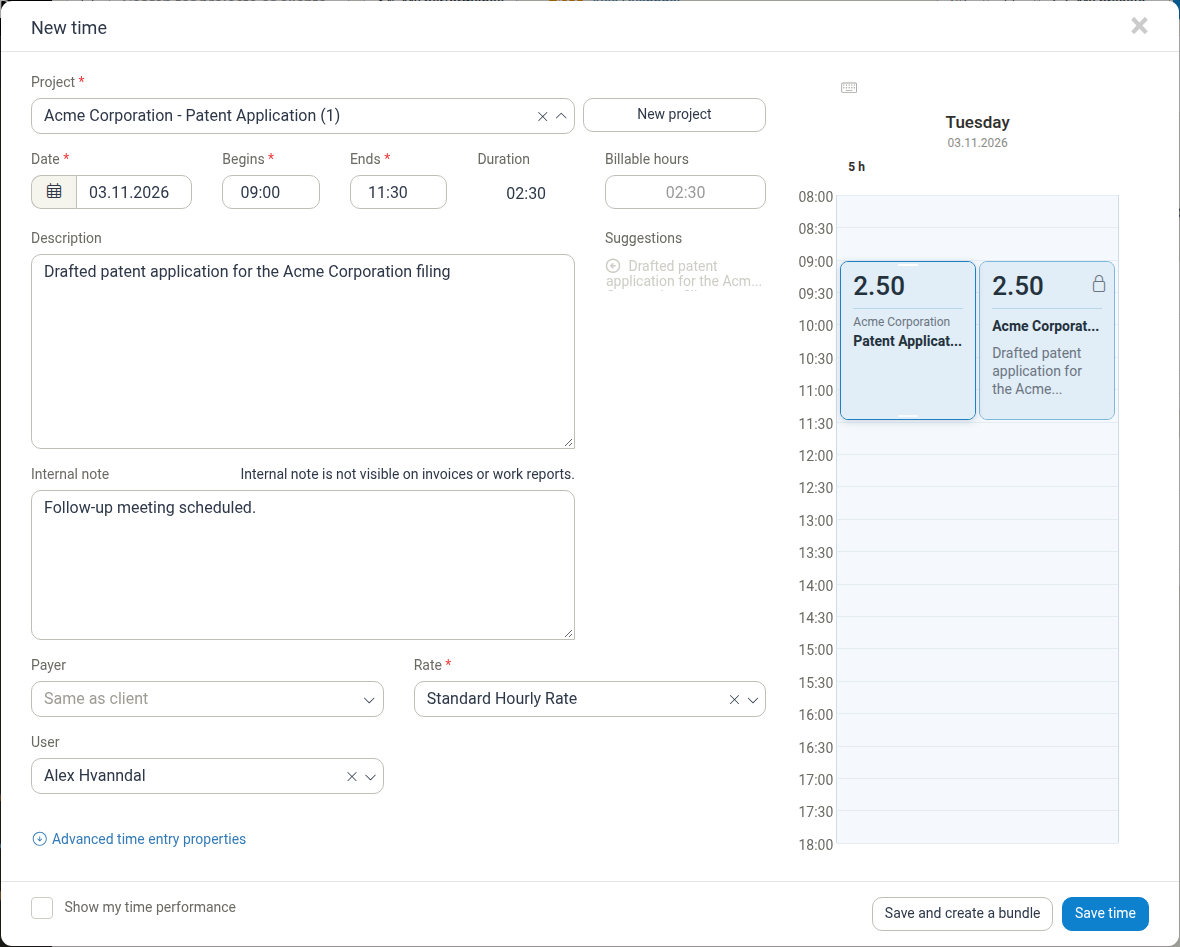
- Click Save time to create the entry, or Save and create a bundle to create related entries together.
Timer Mode
-
In the Week view, click the Timer button in the toolbar to start a timer. The button is greyed out while a timer is already running.
-
A timer bar appears showing 00:00:00 with the buttons Edit, Start, Cancel, and Save.
-
Click Edit to choose the project (and activity) and add a description.
-
Click Start to begin timing.
-
When the work is done, click Save. The New time form opens with the elapsed time filled in, so you can review it and save the entry.
-
To discard the timer without saving, click Cancel.

For a full walkthrough, see Timer.
Time Entry Views
Day View
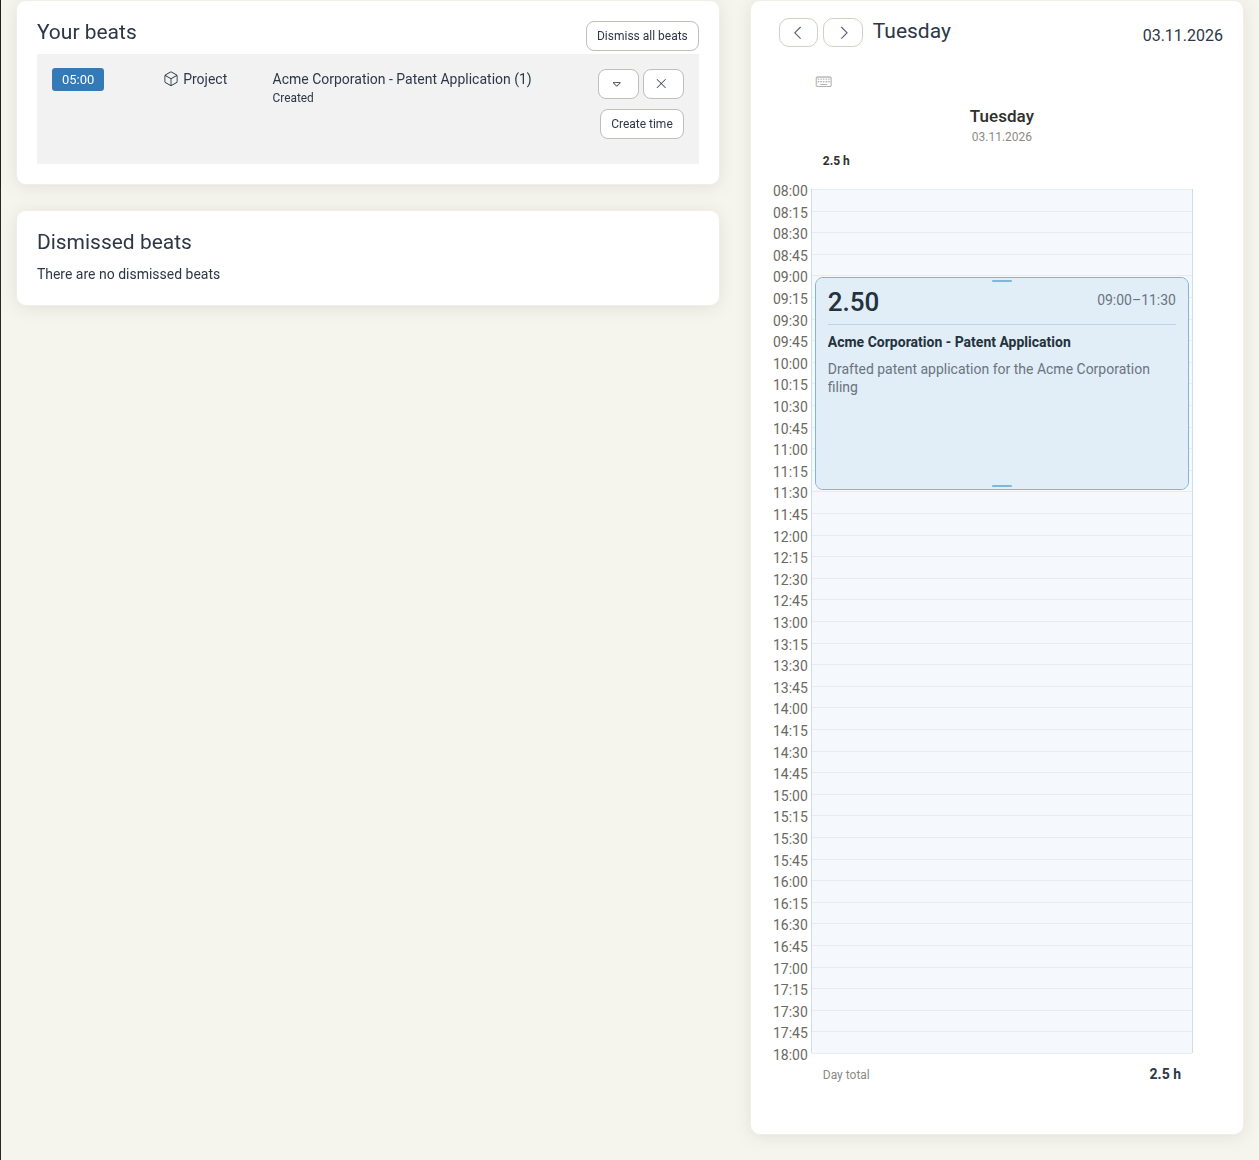
Shows time entries on a timeline for a single day, alongside a Your beats section of suggested work items. Useful for planning your daily schedule.
Week View
Displays the entire week side-by-side with days as columns and time slots as rows. Shows all time logged for the week at a glance. Good for balancing workload across days.
Month View
Calendar-style view showing all time entries for the month. Days display total hours logged. Click on any day to see detailed entries. Helps identify patterns and busy periods.
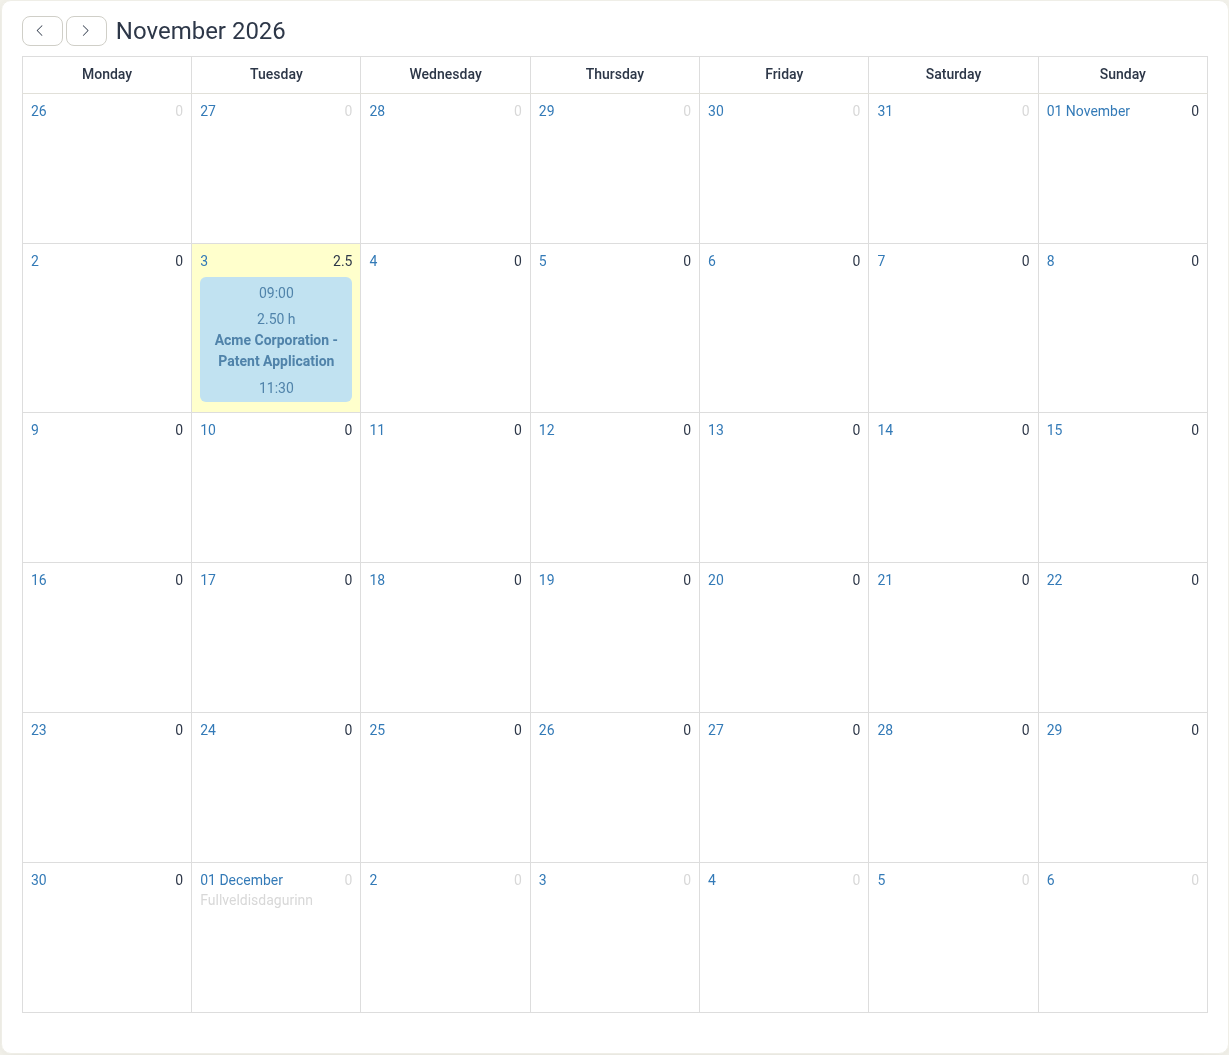
The calendar layout makes it easy to spot busy weeks and identify when you logged the most hours throughout the month.
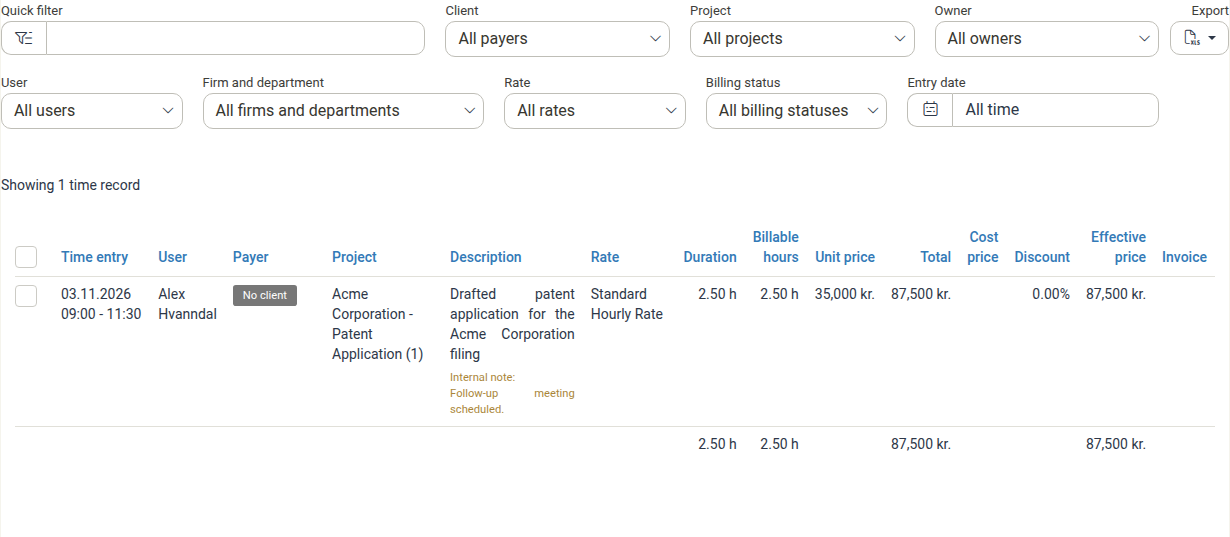
Table View
List of all time entries with detailed information in rows. Supports filtering by:
- Quick filter
- Client
- Project
- Owner
- User
- Firm and department
- Rate
- Billing status
- Entry date
Columns include the time entry, user, payer, project, description, rate, duration, billable hours, unit price, total, and invoice status. Best for searching, reviewing, and bulk operations.
All Billables
Comprehensive view of all billable items including time, expenses, and products. See All Billables for detailed guidance on this view.
What You Can Do with Time Tracking
Track Billable vs Non-Billable Time
Mark time entries as billable to client or internal/non-billable.
Set Daily Targets
Configure expected daily hours to track your progress.
View Performance
Check your performance dashboard to see time logged this month and efficiency metrics.
Edit Entries
Modify time entries after creation to fix mistakes or add details.
Flextime Management
Track overtime and undertime with automatic flextime calculations.
Important Time Tracking Fields
Project The project this time relates to. Required for all time entries.
Activity The type of work performed (e.g., Meeting, Research, Development). Shown when the project has activities.
Begins / Ends The start and end time of the work. The Duration is calculated from these values.
Billable hours The number of hours to charge to the client. It defaults to the duration but can be adjusted, for example to bill two hours for three hours of work.
Description Details about what was done. Shown on client invoices and work reports.
Rate The billing rate applied to the entry. Required for all time entries.
Date When the work was performed. Defaults to today but can be changed.
Finding and Managing Time Entries
Viewing Time Entries
Use the Time section to see entries in different views. In the Table view you can filter by:
- Quick filter
- Client
- Project
- Owner
- User
- Firm and department
- Rate
- Billing status
- Entry date
Editing Time Entries
- Find the entry in any time view
- Click on the entry to open it
- Make changes as needed
- Click Save time
Deleting Time Entries
- Open the time entry
- Click Delete time record
- Confirm the deletion
Using Time Data for Success
Billing
Generate invoices directly from logged time entries.
Profitability Analysis
Compare time costs to revenue for each project.
Resource Planning
See where team members are spending their time.
Performance Reviews
Use time tracking data for employee evaluations.
Best Practices
Log Time Daily
Enter time entries at the end of each day while memory is fresh.
Be Specific
Write clear descriptions that explain what was accomplished.
Use Activities Consistently
Apply the same activity types for similar work to enable better reporting.
Review Weekly
Check your time entries weekly to ensure accuracy.
Set Reminders
Enable notifications to remind you to log time regularly.
Related Topics
- Timer - Tracking time in real time with the timer
- All Billables - A unified view of all billable items
- Time Entries - Detailed reference for time entries and their fields